
m0di pt1
When it comes to building a mountain bike, the goal is always to create something that feels just right. Something that perfectly blends geometry, kinematics, and ride characteristics. This bike represents years of learning, experimentation, and refinement. It was originally conceived as a "simple" enduro, but along the way, it turned into something far more complex. With every design decision, the focus was placed on creating a bike that is not only optimized for performance but also allows for fine-tuned adjustments, making it adaptable without losing its essence. It’s an exploration of what happens when you strip away the limits, a test of how small changes can drastically affect the ride. In the end, it’s not just about the perfect bike for one discipline, it’s about the bike that feels perfect, no matter where you ride.
M0DI (pl. of modus) – Various modes, methods, or manners of doing something.
First up, let’s talk suspension progression. There’s no clear agreement on the ideal amount or shape of progression in rear suspension systems, and every brand seems to have their own reasons why theirs is the best. Maybe they're all right? A straight progression curve is considered a good starting point for a consistent feel and easy damper setup. A lot of riders get caught up in the ratio curves and overlook the more important force curve at the rear wheel – that's what actually matters and what you’ll feel.
The MODI is designed with three distinct progression curves: 25%, 15%, and 7%. In the picture below, you’ll notice a silver pullrod connecting the frame and the rocker arm. Both the frame and the rocker arm feature three positions for the pullrod, with the highest position providing the most progressive mode. The ratios were selected to ensure that all modes offer the same amount of SAG, maintaining consistent geometry. This results in 170mm of rear wheel travel in the highest progression mode and 179mm in the lowest.


These days, we expect chainstays that are sized appropriately, though it’s unclear whether the typical 5mm of adjustment really makes a noticeable difference. That’s why the MODI offers 30mm of adjustment in 5mm increments. The round inserts were chosen because they not only allow for a change in chainstay length, but also provide some adjustability in bottom bracket height. Additionally, they give the option to run either a 29er or 26in rear wheel without significantly compromising the base geometry.The actual chainstay length is 435mm to 465mm or more importantly 445mm to 475mm in SAG.

Let’s take a quick brake.. and talk about anti-rise. I’m pretty familiar with the braking behavior of single pivot bikes, though I’ve also ridden my fair share of Horst link bikes. But how can you compare one bike’s braking behavior to another when everything else is different? The MODI lets you test three distinctly different anti-rise modes on a single bike, while keeping all other parameters the same.By moving the floating brake mount’s pushrod upwards, the anti-rise is lowered, with the lowest position providing the highest anti-rise. The adjustment range is 30%, 50% and 70% (an extra bolt on bracket will allow for 95%, which will reflect the M0DI’s behaviour as if the brake would’ve been attached to the swingarm.)


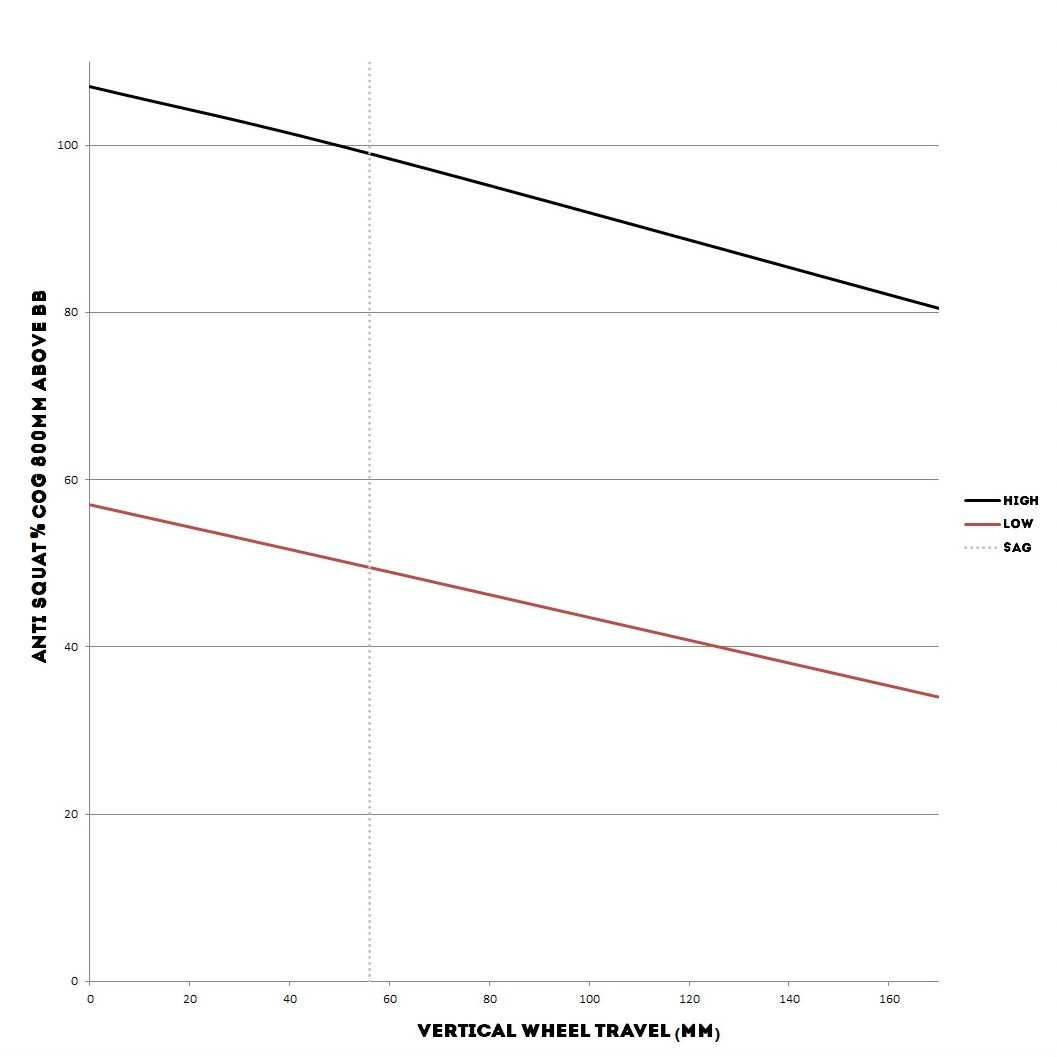
Everyone loves to hear about a bike that ‘climbs like a goat’, but with the focus on pedal kickback as its dark side, I’ve been wondering – just how much do you actually notice anti-squat? The F5, for example, despite having an anti-squat figure of 100%, still bobs a bit, mostly due to leg movement and probably the nearly frictionless suspension and coil shock play a big role here too. When you really push into the pedals, though, the bike barely moves at all.For the M0DI I’ve kept it simple - 100% or 50% anti squat around SAG. A quick swap of the idler wheel, using just a 5mm Allen key, lets you move it from the swing arm to the main pivot in no time, with the main pivot offering the lowest anti-squat mode.

One of the most surprisingly time-consuming components to design was the chain tensioner. With all the adjustments for chainstay length and anti-squat, there’s a lot of chain that needs to be stored somewhere. Initially, I opted for something similar to Pinion's design, but with much larger wheels. However, as you might expect, the area around the front chainring is pretty cramped, and the design simply didn’t fit or give enough mud clearance. Nor was I willing to give up on the large pulley wheels, as they help reduce friction. So the tensioner ended up mid chainstay, half tucked away to stay out of harm’s way (unfortunately adding to the unsuspended mass).
During the first test ride, another issue arose – the chain slipped. While the design doesn’t offer much chain wrap, I’ve seen similar setups on other bikes without issue. The culprit turned out to be the front sprocket design. Its tooth profile is just too sharp, causing the chain to ride up the teeth and skip. So, back to the drawing board to design a front chain guide, this time offering better chain wrap and even integrating a chainring bash guard.
(Side note: all pulley wheels are 13T, run on industrial bearings and are 3D printed in PLA. The tensioner uses a standard Shimano derailer torsion spring.)


Last but not least – you might have noticed the Pinion gearbox, but did you catch the Eightpins dropper post? Two incredible innovations I've been dying to try since they first hit the market, now united on this bike of all bikes. This has been the biggest bike project I've ever taken on, pouring hours into designing, redesigning, machining, polishing, and refining every detail. What I’ve built isn’t just a bike – it’s a testament to the pursuit of perfection, blending raw functionality with the beauty of form. This isn’t just the craziest bike I’ve ever built; it’s the bike that has all the answers… (fingers crossed)
And now what you’ve all been really waiting for - the numbers (Static / Neutral)